Friday, February 29, 2008

Francie

bluebarkbottomcropped


Some people called it the Tree of Heaven. No matter where its seed fell, it made a tree which struggled to reach the sky.
-- Betty Smith, A Tree Grows In Brooklyn


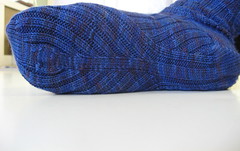
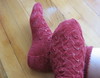
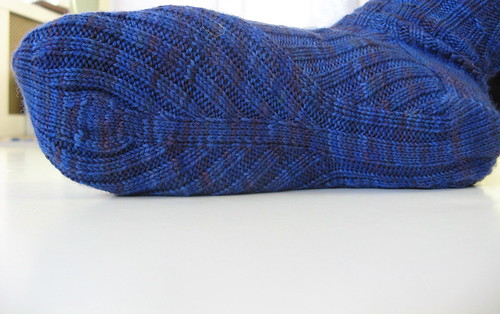
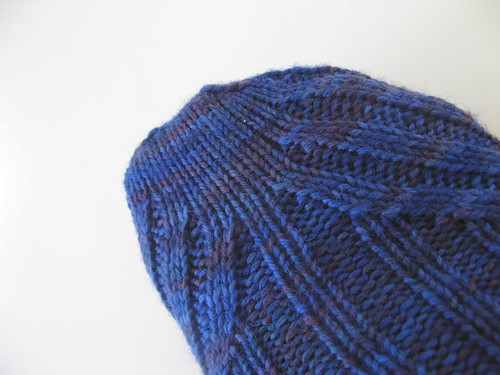
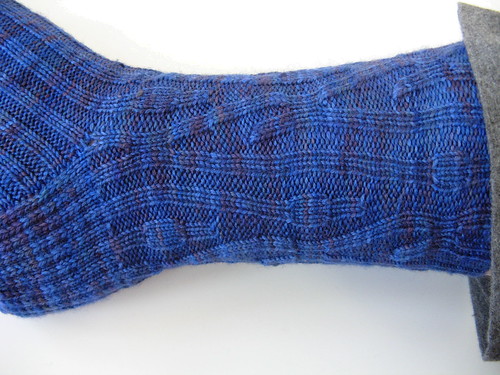
These socks are named for Francie Nolan, the main character in my favorite book, A Tree Grows In Brooklyn. Like the book, and like Francie, the socks are full of unexpected beauty and character. There are stories hidden in their folds, interesting shapes to be found in their bark, and new ideas to be found in their branches.

Smooshy Sock Preview


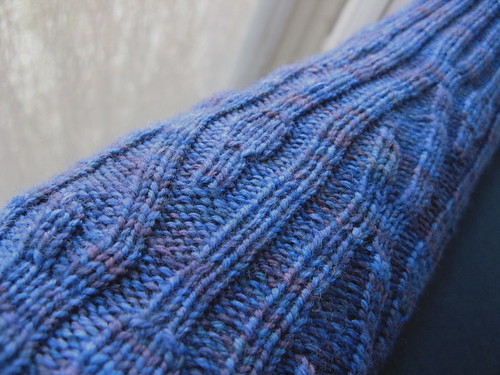
These socks were designed with an adventurous knitter in mind. While the leg of the socks is easier to execute than it might appear at first glance, the foot of the socks involves shaping that is probably new to most sock knitters. This shaping results in interesting curves in new places, a foot-hugging contour that surpasses the comfortable clinging power of most traditional ribbed socks, and a new way to shape a toe. The socks may take a bit more concentration than you’re used to, particularly once you get to the foot, but once you find the rhythm of these socks everything should fall into place.

Nataliefootcropped
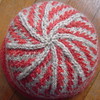
(photo used with the permission of Natalie)


These socks were knit with Dream In Color Smooshy, at 8 stitches per inch, on U.S. size 1 (2.25 mm) DPNs. You can use any sock yarn you like, preferably in a solid or nearly-solid color. This sock is very stretchy, and will fit a wide range of foot sizes. You can easily customize the fit of the leg and foot by changing needle sizes, to make the circumference a bit wider or a bit narrower. Because the entire sock is based on 2x2 ribbing, the sizing range is generously large. There are instructions in the pattern for customizing the length of the leg and foot of the sock.

Because these socks are a bit different than your average socks, those of you who have knit socks before will have an easier time with this pattern. There is no one skill in these socks that is difficult, but they may take more concentration than your average sock pattern until you get into their unique rhythm. Those of you who can read your knitting (see the difference between knit and purl stitches) will have an easier time with this pattern, although I try to give as much instruction as is reasonably possible. I found them really fun to knit, because I was doing things I'd never quite done before, and it was exciting to see how it would all turn out in the end! There is a lot of new stuff in these socks, and if you like new stuff in your knitting, I think you'll really enjoy knitting this pattern.

The Francie pattern is available for sale right now, as a PDF download. I am using Ravelry's new pattern delivery system, which means that pattern delivery is automatic -- no more waiting for me to email you anything! You do not need to be a member of Ravelry to use the system, although if you are, you have the option to add the PDF directly to the library in your notebook, which is very convenient. The cost of this pattern is $6.50, and you can click the button below to purchase it:


Here is a direct link to the Ravelry page for the pattern.
(Please keep in mind that if you use an e-check, the pattern will not be delivered until the check clears. I believe this can take up to 10 days. I do keep an eye on my Paypal account on a daily basis, to make sure that everyone who has paid by e-check gets their patterns as soon as possible after the check clears, because I know that it is difficult to wait!)

Let me know if you have any problems with payment or with receiving your copy of the pattern. And of course, please contact me if you have any difficulties with the pattern. It has been test knitted by the wonderful and talented Natalie, and proof-read and tweaked until my eyes bled, so I hope it is free of errors. If I (or anyone else) find major errors, I will update the PDF and send new copies to those who have already purchased it. I am quite proud of this pattern, and want to make sure that it brings as much joy to others as it has to me.

bluebarktoe


Oh, and the contest winner! I was a bit embarrassed when the very first person to guess figured out the origin of the pattern name. I thought it must have been much too easy, but was relieved when most of the rest of the contest participants didn't have a clue. Congrats to Dove for being the first person to not only enter the contest, but to enter with the correct answer. Boy are you fast! Please send me an email at the email address in the sidebar, and I will send you a copy of the pattern. Thank you to everyone else who entered. Your guesses really entertained me.

bluebarkleg


Oh, and here's the legal mumbo jumbo from the end of the pattern. There has been a lot of discussion on Ravelry lately about this sort of stuff, and I have come to the conclusion that it is best to put this information here, as well as in the PDF. The short story is that use the pattern however you want for personal use. The long story is:

This pattern was created and written by Rebekkah Kerner. It is intended for personal use, meaning that you may make as many pairs of socks from this pattern as you like for yourself, or to give away as gifts. This pattern is not to be distributed, for free or for money, in any format, without the permission of Rebekkah Kerner. Items created from this pattern are not to be sold or used for commercial gain without the permission of Rebekkah Kerner. If you are interested in working out an agreement to distribute this pattern or to sell socks made from this pattern, please contact Rebekkah using the contact information on the title page of the pattern.


Smooshy sock - 3/4 view

Labels: , , , , ,

Friday, December 28, 2007

1989 on my mind

December has been a frenzy of pattern writing, knitting, ripping, some minor cursing, more knitting, more ripping, designing, and enough spinning to adhere little bits of pink fluff to every surface in the house. (Including my pants.) It's unfortunate that there couldn't be more blogging on that list, but I was determined to finish one specific thing before I blogged again, and I am at last done. I present my newest hat pattern, simply named "1989".

1989 hat turquoise mosaic


This hat pattern was written for an adult's head, but can easily be sized down (or up, for a large adult's head) by altering needle size and yarn weight. Recommendations for how to alter the size by changing yarn weight, gauge, and needle size are given in the pattern, to allow you to knit any size from preemie to very large adult. The version you see here was knit in worsted weight yarn on size 7 needles, in a mystery yarn given to me by a friend. It uses about 50 grams of yarn, though you might want a 100 gram skein to be on the safe side. If you are unsure of what yarns may work with the hat, I give a few recommendations in the pattern, and would be happy to give more recommendations if necessary. I also knit a version in charcoal grey Harrisville Highland:

1989 hat grey mosaic


Click here to see any of the photos in those mosaics close up.

This hat is designed so that an adventurous beginner can knit it, but so it will hold the attention of a more experienced knitter. It is knit in the round, and involves a variety of types of increases and decreases to create the patterning. I give detailed instructions for all of the shaping in the pattern.

The main patterning is charted out, with a full chart key, as well as the above-mentioned explanations of all of the increases and decreases. The crown shaping of the hat is written out, round by round.

This hat was a really fun, quick knit for me. I'm not a fast knitter, but each hat took about one weekend day. I almost ran to the LYS to get a skein of Noro, because I am eager to see how beautiful it will look in a striping or variegated yarn. Hopefully a few of you will choose to use such a yarn, so I can see how it looks!

The cost of the pattern is $5.50. Click the button below to purchase it. You will automatically be emailed a download link for the PDF:


If you'd prefer, you can also buy it directly from its Ravelry page.

Please let me know if you have any questions, any problems with the pattern, or just want to know more about the hat! There is an explanation for the hat name in the pattern. But if enough of you seem curious about it, I'll write up the explanation in a future blog post, too.

Labels: , , ,

Thursday, February 01, 2007

Mittens for Alex

Alex's mittens


Cascade Eco Wool, my own pattern

I decided to create my own mitten pattern because I had trouble finding a basic pattern out there that was exactly what I wanted. I realized that, since I was fond of Charlene Schurch's basic mitten shaping/construction, I should take the mittens I just made as a starting point, and calculate all the specifics based on my gauge (in a much thicker yarn) and the hand size I wanted to knit for. Here is my pattern:

materials
  • 100 grams of Cascade Eco Wool (This yarn comes in 250g / 478 yard skeins, and is what I consider a heavy worsted/aran weight. 100 grams of this yarn is about 190 yards.)

  • size 6 DPNs, or size needed to achieve gauge

  • 2 lengths of a smooth scrap yarn

  • 2 stitch markers

  • darning needle

gauge
5.5 stitches and 7 rows per inch, in stockinette

sizing
These mittens were designed to fit a hand that measures 8" in circumference. There is about 1" of ease, resulting in mittens that are about 9" around. If your hand is smaller or larger, or you want a looser or tighter fit for the mitten, play with gauge, stitch count, and row count. It's not that hard once you understand how the mitten is constructed. (Note: I designed these mittens to have about 1" of ease in length, as well. But because the length of the mitten when worn is slightly different then when measured flat, you'll want to try the mitten on as you go to determine the correct length.)

casting on / cuff
Using your preferred stretchy cast on (I prefer Twisted German -- link to pdf), cast on 44 stitches. Distribute over 4 DPNs, and join in the round without twisting. Knit 21 rounds of k2p2 ribbing.

lower hand / thumb gusset
The rest of the mitten is in plain stockinette. On the next (first stockinette) round, increase 6 stitches, for a total of 50 stitches. I did the increases as follows:

k7, inc, k7, inc, k8, inc, k7, inc, k7, inc, k7, inc, k1


Knit one plain round.

Gusset shaping starts on the next round. K24, place marker (pm), make 1 right (m1r), k1, make 1 left (m1l), pm, k25. (If you need instruction on how to make increases, try this site. Their strand increase 1 = my m1r, and their strand increase 2 = my m1l.)

Knit one plain round

Alternate increase and plain rounds 8 times more. For each increase round, create a stitch right after the first stitch marker and right before the second stitch marker, knitting all other stitches between the markers.

At the end of the gusset shaping, there should be 19 stitches between the stitch markers. Knit the next row, placing all 19 of these stitches on scrap yarn (and removing the stitch markers), and casting on one stitch in their place. There should now be 50 stitches on your needles, and 19 thumb stitches on the scrap yarn.

the rest of the hand
Knit around and around, with no increases or decreases, for 33 rows. (An easy way to make the hand longer and shorter is to alter the number of rows you knit in this section.)

decreases and finishing the hand
Knit the next round as follows: ssk, knit 20, k2tog, k1, ssk, knit 20, k2tog, k1

Continue in a similar manner every round, decreasing 4 stitches per round. (It may be helpful to mark the "seam" stitches between the paired decreases with stitch markers.) For example, the next round will be: ssk, knit 18, k2tog, k1, ssk, knit 18, k2tog, k1

When there are only 14 stitches left on the needles (6 from the mitten front, 6 from the mitten back, and the 2 seam stitches between the paired decreases), you are done knitting. Arrange the stitches so they are split between only 2 needles, 7 front and 7 back. Graft these stitches together using kitchener stitch.

thumb
Put the thumb stitches from the scrap yarn back on your needles as follows: 7 on the first DPN, 7 on the second DPN, and 5 on a third DPN. Pick up 2 stitches from the thumb "crotch", and put them on the third DPN, for a total of 7 on that needle. Knit one round, knitting the two picked up stitches through the back loop, to help tighten them up. Knit 10 more rounds plain.

Start thumb decreases: ssk, knit around to 3 stitches before the end of needle 3, k2tog, k1. Repeat this decrease row every round until there are only a total of 9 stitches left on the needles. (You'll have to shift some stitches around from needle 2 to needles 1 and 3.) Break the yarn, and using a tapestry needle, draw it through the 9 stitches, poke it down through the hole in the center at the top of the thumb, and pull tight until the hole is closed.

finishing
Weave in ends, and block as desired. You may need to close up holes at the thumb crotch when weaving in ends, depending on how successful you were at avoiding them when picking up stitches.

And when you're finished with the first mitten, cast on for the second one. Because the thumb grows out of the side of the mitten, there is no designated left or right mitten. This means that you can follow the same instructions for the other mitten.


If I were to knit these mittens again, I might do so on smaller needles, at a tighter gauge. These mittens, in this yarn, are acceptable at this gauge, but could be denser. I was concerned about not having enough yarn, when it turns out I only needed 2/3 of what I had. (The rest, though, will go into storage for any future repairs needed on the mittens, hat, or sweater.) If I were to knit these mittens for myself, in the same yarn, I'd simply go down a needle size or two to make them smaller. Alex has bigger hands than I do. See:

Alex's mitten, my hand


I'm still in simple knitting mode. Simple mittens, and now fairly simple socks. (A chevron/rib pattern, in yarn so bright I'm almost afraid to see what happens when I photograph it.) I have some slightly more complex projects I want to knit with yarn in my stash, but between needle issues and hand pain (not caused by knitting, but certainly affecting it), I'm finding it difficult to get started on anything complex. We'll see how I feel when the socks are done.

Labels: , ,