Dr. Scourer or: How I Learned to Stop Worrying and Love the Lanolin
(In which she goes on at great length about what she has learned washing wool.)
Part One: Babydoll Southdown
I started to write about my very first scouring experience, with some Babydoll Southdown I bought on Etsy. As I wrote, I realized that I forgot a lot of the details that might make my experience useful to others. So instead of going through what I did step by step (because I just can't), I'll just tell you what I learned from that experience.
1. Sheep are dirty. Really dirty. I remember that I did an initial soak in cooler water than I used for the scouring. (How cool? Beats me! How long? uh...) I've read in various places that an initial soak can get rid of a lot of the junk that's on a fleece, before you start focusing on getting the lanolin off later on. I'm not sure exactly what all was in that fleece to start off with, but I can tell you that it's a beautiful rusty orange color. And stinky.
2. Wool compacts a lot when soaked. Also, if you want to keep any semblance of order among the locks, you need to really stuff the bag full. I had the wool in a mesh laundry bag, and learned right away that putting some wool in a bag, and then putting that bag in a large container of water means that you just end up with a soggy jumble of stuff at the bottom of the bag. More on successful use of mesh bags later...
3. I don't like VM (vegetable matter). I spent a long time picking out the worst of it, but there was still a lot left. Picking it out seemed like a thankless task, and I fear that I may be one of those people who will seek out covered fleeces in the future.
In the end, I wasn't very satisfied with my experience scouring the Babydoll Southdown wool. In part probably because it was so full of VM, but also because it was hard to tell how clean I was getting it, because of the dark color. Of course, the only logical thing to do was to buy a "nicer" (this is all subjective of course) fleece. I was thinking of waiting until New Hampshire Sheep & Wool next spring, but as luck has it, Julie (the lovely jsandell on Ravelry) had some fleece she was thinking of selling, and I knew I could trust her to sell me quality stuff. (I had already bought some scoured Corriedale locks from her, in addition to some beautiful processed and hand dyed spinning fiber.) So I ordered 3.5 pounds of white corriedale that she said was particularly nice, confident that it would nice enough to be worthy my time scouring and then processing.
Part Two: 3.5 pounds of Corriedale
3.5 pounds sounds like a lot, but I wanted enough for a sweater, should I choose to use the fiber for such a large project. I knew it would be on the greasy side, which means that it would lose a lot of weight in washing. I was also pretty sure that I wanted to comb the fiber, which would mean a lot of waste. (More on that in a future post.) And after losing all that weight to washing and combing, I'd still want enough to be able to sample and play with, before starting to spin in earnest. And then I'd want enough to swatch with, once it was all spun up. See how quickly 3.5 pounds transforms from a huge amount of fiber to what I'm merely hoping would be enough for a sweater? Oh, and also calculated into those 3.5 pounds is fiber lost to human error, of which I wanted to anticipate a lot, since I was new to scouring fleeces and had never touched a pair of wool combs before. I am most certainly human, and have spent almost 32 years perfecting my ability to make errors of all varieties!
I chose the Corriedale because I knew it would be good for combing, I knew it would be at least a moderately soft fiber and suitable for a sweater, and because it was white. Just as I wouldn't wish fun fur on a new knitter because it makes it so hard to see your stitches, I thought a white fleece with good lock structure would be ideal for a new scourer. It would let me see my mistakes and successes a lot more clearly than a darker colored fleece.
My first scouring experiment was the Yarn Harlot's stovetop method. I actually had the "bright" idea to do it in the oven, for some reasons which now escape me, and other reasons which now make me feel stupid. (Do you know how inefficient an oven is at heating large containers of liquid? The answer is "very." This is why we have stoves, people!) I bought an undyed pillowcase, a huge bottle of blue Dawn dishwashing liquid, rubber gloves, a meat thermometer, and a big disposable roasting pan. I followed her method pretty closely (once I figured out that in the oven was not going to work well), and while I was fairly happy with the results, I wasn't all that fond of the process. It took a very long time, and I felt that the pillowcase prevented the water and detergent from penetrating the wool as well as I'd like. Similarly, I felt that it made it difficult to "rinse" the wool. I also didn't like the clumsiness of trying to drain a very hot pan of very hot water, while keeping the wool from falling into the sink.
At the time, I was also concerned that the tips of some of the locks, which were dirtier than the rest of the locks, were not coming clean. I later learned that this method actually did a pretty good job of cleaning the dirtier tips, but at the time I didn't have anything to compare it to, and had been unrealistically expecting absolute perfection.
I decided that my next try would be in the sink. I bought some smaller mesh laundry bags at Joann Fabrics -- small enough that I could fill them enough to keep the locks from all wanting to sink to the bottom of the bag, and small enough that they would fit well in the kitchen sink. As it turns out, I can perfectly fit two of them side by side in my kitchen sink, which works out very nicely.
I discovered that my hot water heater is not as adjustable as I'd like. I wanted water a lot hotter than 120 F (the hottest I can get our tap water) to scour the wool, so I decided to boil water in a huge pot on the stove, to add to the hottest tap water I could get. This yielded water about 150 F, which I was happy with. I've read anywhere from 110 - 180 as ideal for scouring wool, and have yet to find a real consensus on the matter. 150 seemed like a good compromise, and was fairly easily achievable for me. (Note: If you have small children or particularly forgetful or clumsy adults in your household, be cautious about turning up your hot water heater, lest anyone be scolded. Obviously, our hot water heater has anticipated this in not allowing me to turn it up to scolding temperature! I am most certainly a forgetful, clumsy adult, and am beaming proud that I've made it through this experience with no serious burns.)
My initial sink method went as follows: First, I separated locks of wool, and placed them with the tips all facing in the same direction in the small mesh bags. I had a few layers of locks, with nothing separating the layers. I would start filling the sink with the hottest tap water possible as my pot was close to boiling, add in the boiling water, and continue adding in tap water until it seemed like enough. (It's amazing how long it takes to boil a huge pot of water, and to fill a kitchen sink to just the halfway mark.) I then squirted enough Dawn in the water to make it turn a reasonable blue color, and gently stirred with a wooden spoon that was designated as fiber only. (I don't want to serve food with the same spoon that touches dirty wool water.) I then placed the bags in the sink, horizontally, so as not to disturb my carefully arranged locks. I gently pushed them down with the spoon, until they sank a bit under the water. I let them sit for 15-20 minutes, then carefully lifted them out, let them drip a good deal of water, and put them in the roasting pan (remember that thing?) while I drained the sink and waited until I had boiling water to repeat the process. (I filled the pot and put it on the stove as soon as I put the wool in the water, but it takes so long to boil that the wool got a good rest between each step.) I repeated this soapy soaking 2 more times. I found that on subsequent soakings, the wool packets were very reluctant to sink into the water. My first attempt to solve this problem was to put a couple of wire cooling racks (the kind you use for cookies) on the wool packets, put the roasting pan on top of that, and partially fill it with water, to weigh everything down. That was clumsy and difficult.
After the 3 washes, I did 3 soapless rinses, using the hottest water from the tap. Then I gently squeezed each wool packet, removed the contents, and left the wool on a mesh sweater rack to dry.
What did I learn from my first attempt at the kitchen sink method? I found that the tips didn't come as clean as in the stovetop method, and that cleaner wool floats more readily than dirtier wool. I also learned that one must exercise patience when it comes to wet wool, because separating those layers of locks was a lot easier once it had dried a bit. Before it dried, it just seemed like a matted mess, even though I am now confident that I didn't felt a thing. This reminds me of an episode of Cast On, in which Brenda talks about the urge to toss a lace shawl that she has just washed in preparation for blocking, because it looks like such a hopeless messy pile of stuff. Raw wool is a lot like that. When you pull it out of the water, you can't quite believe what you just did to it, and just have to have faith that, really, it's okay. Think of what your hair looks like when wet. It really does get better.
I found advice somewhere online that picking apart dirty tips before washing can help them get clean, because they'll be more open, allowing the water and detergent to penetrate better. For my next batch, I did this. It was a very labor intensive process -- it took me an hour and a half to prepare just one of the two small mesh bags for scouring. However, the tips did come cleaner, using an otherwise identical process. But I wasn't convinced that it was absolutely worth the time investment, so I tried hand carding one of the "dirtier" locks (none of them were really that dirty) from the previous batch, and found that the resulting rolag was white and fluffy and beautiful. I wouldn't have known that it had a dirty tip, possibly because combing it helped eliminate some of the dirt particles that were stuck in it. Another new thing I did with this batch was to place pieces of tulle between the layers of locks, to keep them more separated. I stole the idea from Sock Pr0n, and it worked beautifully. I also added some wool wash to the last rinse, to add a light scent (of tea tree oil) to the locks, and to hopefully add in some oils, so they wouldn't be too dry from all the scouring.
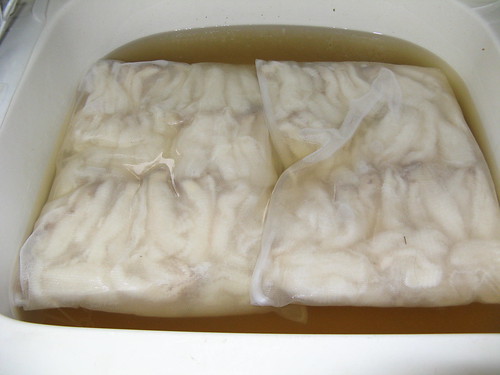
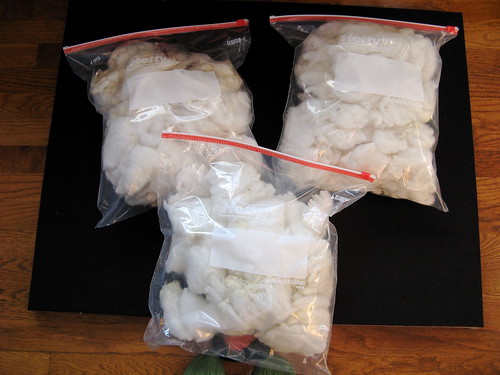
I had hoped to try washing the rest of what I had left (which felt like a lot) in one or two batches, in a larger mesh bag in the bathtub. But I was unable to get my tap water temperature as hot as I'd like, and did not feel comfortable carrying a huge pot of boiling water from the kitchen to the bathroom. (I already feel that I'm partaking in a dangerous activity by carrying it a couple of feet from the stove to the kitchen sink!) And then I couldn't find my bigger mesh bag. So I decided to try the sink again, but with a twist. After my hour and a half tip picking prep with the previous batch, I read other advice suggesting that a good long soaking can also help open and soften dirty tips, making any subsequent washing more efficient and effective. So I carefully stuffed my 2 smaller mesh bags (again using layers of tulle to separate the layers of locks), and let them soak for a few hours in warm water. As with my initial soak of the Babydoll Southdown, I ended up with rusty orange water. I still don't understand how I could get such bright water from such light colored locks, but it's pretty cool. Here's a photo:
The rest of the process was the same as the other sink washes, except that I decided to do only 2 washes and rinses. The only reason I had been doing three before was to try to get those tips clean, and since I knew that even slightly dirty tips would yield very nice processed wool, I decided to stop obsessing. I also flipped the bags over halfway through each 20 minute session, to overcome any problems caused by its tendency to float. The soaking method worked very nicely, and I think the tips even came a bit cleaner than with the very time consuming picking method. I also started rolling and gently squeezing the bags between each wash, to get as much dirty water out as possible. This will probably be my method from here on out.
To recap, here are the supplies and procedure for the method that works for me. This method may not be best for everyone or for every fleece, but I'm pretty happy with it as a way to scour small to medium sized batches of greasy wool, while maintaining lock structure for combing:
* 1 large kitchen sink
* 1 pair of rubber gloves
* 1 large roasting pan, or other container to hold the bags of fleece while the sink is draining or being refilled
* 1 large wooden spoon, or other stirring implement
* One or two small mesh bags of the sort they sell for washing delicates in a washing machine. I picked mine up at Joann Fabrics.
* One huge pot for boiling water (if you can't turn up your hot water heater, or don't want to because you have small children in the house)
* A yard or so of tulle. I totally overbought, but it's dirt cheap. I had a few choices, and went for the variety with larger holes, and chose white, so there would be no risk of dye bleeding onto my wool.
* scissors to cut the tulle
* A meat or candy thermometer, to check on the temperature of your water. This can be very handy, when you feel that your huge pot of water is about to boil, but aren't sure. I have more than once checked with the thermometer, found that it was already at 206 F (boiling is 212), and decided to just stop waiting and dump it in the sink. Close enough! I watched pot may never boil, but with a thermometer I don't really need it to.
* A large container of blue Dawn dishwashing liquid. (There are other detergents that will work, but this is a popular one, and is easy for me to find at the grocery store.)
* Some no-rinse wool wash, to add to your final rinse.
* A space to lay out the wool to dry.
* A kitchen timer, so you don't forget your wool. (You don't want to leave it in for too long, because the lanolin will redeposit itself onto the wool if the water cools down too much!)
Stuff your bags with wool. If you plan to comb the wool, try to keep it neatly arranged, with layers of tulle between layers of wool. Fill the sink at least halfway, and let the wool soak for at least a couple of hours. (Overnight works well.) Drain the sink, put the wool somewhere (roasting pan, for example) to wait, and fill your sink with very hot water. (I aim for 140-150 F, using boiling water to supplement the tap.) Add in some Dawn, stir, then put in your wool. Set your timer for 10 minutes. After 10 minutes, flip the wool, then let it sit for 10 more minutes. Drain the water, gently squeeze the wool packets, set them aside, and repeat. (If your wool is fairly clean and non greasy, you may not need to repeat. If it's particularly dirt and greasy, you may want to do this three times instead of two.) Next, fill the sink at least halfway with hot water from the tap. It doesn't need to be as hot as the wash water. Let it soak for a good long while, flipping it partway through. Drain, gently squeeze wool packets, and repeat, with slightly cooler water, and a little bit of wool wash. Drain, squeeze your wool, and lay it out in a quiet, sunny (if possible) spot to dry, removing it from the bags and separating the layers, so it will dry more quickly. Unless you're in the desert, count on letting it sit at least a few days. (I find that I only have time to do this once a week or so, so I'll just let it sit for a week or more on the enclosed back porch, until I do the next batch.)
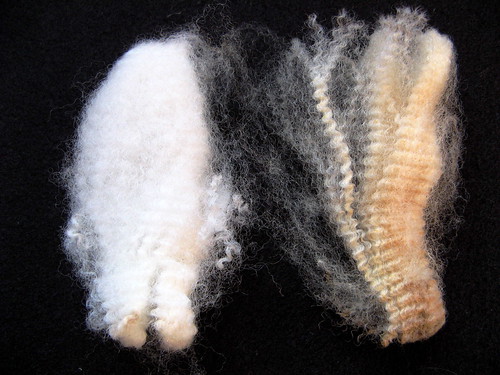
Here are some photos of the magic of scouring:
I hope my bumblings as a new wool scourer are helpful to some of you! Thank you so much to the people who answered questions, exchanged ideas, and generally listened to my ramblings as I was finding my way through this process. (In particular, Stephanie Pearl-McPhee, who generously answered an email in the midst of traveling, and the folks in the Fiber Prep group on Ravelry, which is an amazing resource for anyone thinking of doing any sort of fiber prep.)
I am planning a future post about hand carding and combing fiber. I also have some finished objects to blog about, once I have my photos all together. Again, let me know if you have any fiber prep (or other) questions. I'm really enjoying it, and want to do all I can to convince more of you to try it out.
Part One: Babydoll Southdown
I started to write about my very first scouring experience, with some Babydoll Southdown I bought on Etsy. As I wrote, I realized that I forgot a lot of the details that might make my experience useful to others. So instead of going through what I did step by step (because I just can't), I'll just tell you what I learned from that experience.
1. Sheep are dirty. Really dirty. I remember that I did an initial soak in cooler water than I used for the scouring. (How cool? Beats me! How long? uh...) I've read in various places that an initial soak can get rid of a lot of the junk that's on a fleece, before you start focusing on getting the lanolin off later on. I'm not sure exactly what all was in that fleece to start off with, but I can tell you that it's a beautiful rusty orange color. And stinky.
2. Wool compacts a lot when soaked. Also, if you want to keep any semblance of order among the locks, you need to really stuff the bag full. I had the wool in a mesh laundry bag, and learned right away that putting some wool in a bag, and then putting that bag in a large container of water means that you just end up with a soggy jumble of stuff at the bottom of the bag. More on successful use of mesh bags later...
3. I don't like VM (vegetable matter). I spent a long time picking out the worst of it, but there was still a lot left. Picking it out seemed like a thankless task, and I fear that I may be one of those people who will seek out covered fleeces in the future.
In the end, I wasn't very satisfied with my experience scouring the Babydoll Southdown wool. In part probably because it was so full of VM, but also because it was hard to tell how clean I was getting it, because of the dark color. Of course, the only logical thing to do was to buy a "nicer" (this is all subjective of course) fleece. I was thinking of waiting until New Hampshire Sheep & Wool next spring, but as luck has it, Julie (the lovely jsandell on Ravelry) had some fleece she was thinking of selling, and I knew I could trust her to sell me quality stuff. (I had already bought some scoured Corriedale locks from her, in addition to some beautiful processed and hand dyed spinning fiber.) So I ordered 3.5 pounds of white corriedale that she said was particularly nice, confident that it would nice enough to be worthy my time scouring and then processing.
Part Two: 3.5 pounds of Corriedale
3.5 pounds sounds like a lot, but I wanted enough for a sweater, should I choose to use the fiber for such a large project. I knew it would be on the greasy side, which means that it would lose a lot of weight in washing. I was also pretty sure that I wanted to comb the fiber, which would mean a lot of waste. (More on that in a future post.) And after losing all that weight to washing and combing, I'd still want enough to be able to sample and play with, before starting to spin in earnest. And then I'd want enough to swatch with, once it was all spun up. See how quickly 3.5 pounds transforms from a huge amount of fiber to what I'm merely hoping would be enough for a sweater? Oh, and also calculated into those 3.5 pounds is fiber lost to human error, of which I wanted to anticipate a lot, since I was new to scouring fleeces and had never touched a pair of wool combs before. I am most certainly human, and have spent almost 32 years perfecting my ability to make errors of all varieties!
I chose the Corriedale because I knew it would be good for combing, I knew it would be at least a moderately soft fiber and suitable for a sweater, and because it was white. Just as I wouldn't wish fun fur on a new knitter because it makes it so hard to see your stitches, I thought a white fleece with good lock structure would be ideal for a new scourer. It would let me see my mistakes and successes a lot more clearly than a darker colored fleece.
My first scouring experiment was the Yarn Harlot's stovetop method. I actually had the "bright" idea to do it in the oven, for some reasons which now escape me, and other reasons which now make me feel stupid. (Do you know how inefficient an oven is at heating large containers of liquid? The answer is "very." This is why we have stoves, people!) I bought an undyed pillowcase, a huge bottle of blue Dawn dishwashing liquid, rubber gloves, a meat thermometer, and a big disposable roasting pan. I followed her method pretty closely (once I figured out that in the oven was not going to work well), and while I was fairly happy with the results, I wasn't all that fond of the process. It took a very long time, and I felt that the pillowcase prevented the water and detergent from penetrating the wool as well as I'd like. Similarly, I felt that it made it difficult to "rinse" the wool. I also didn't like the clumsiness of trying to drain a very hot pan of very hot water, while keeping the wool from falling into the sink.
At the time, I was also concerned that the tips of some of the locks, which were dirtier than the rest of the locks, were not coming clean. I later learned that this method actually did a pretty good job of cleaning the dirtier tips, but at the time I didn't have anything to compare it to, and had been unrealistically expecting absolute perfection.
I decided that my next try would be in the sink. I bought some smaller mesh laundry bags at Joann Fabrics -- small enough that I could fill them enough to keep the locks from all wanting to sink to the bottom of the bag, and small enough that they would fit well in the kitchen sink. As it turns out, I can perfectly fit two of them side by side in my kitchen sink, which works out very nicely.
I discovered that my hot water heater is not as adjustable as I'd like. I wanted water a lot hotter than 120 F (the hottest I can get our tap water) to scour the wool, so I decided to boil water in a huge pot on the stove, to add to the hottest tap water I could get. This yielded water about 150 F, which I was happy with. I've read anywhere from 110 - 180 as ideal for scouring wool, and have yet to find a real consensus on the matter. 150 seemed like a good compromise, and was fairly easily achievable for me. (Note: If you have small children or particularly forgetful or clumsy adults in your household, be cautious about turning up your hot water heater, lest anyone be scolded. Obviously, our hot water heater has anticipated this in not allowing me to turn it up to scolding temperature! I am most certainly a forgetful, clumsy adult, and am beaming proud that I've made it through this experience with no serious burns.)
My initial sink method went as follows: First, I separated locks of wool, and placed them with the tips all facing in the same direction in the small mesh bags. I had a few layers of locks, with nothing separating the layers. I would start filling the sink with the hottest tap water possible as my pot was close to boiling, add in the boiling water, and continue adding in tap water until it seemed like enough. (It's amazing how long it takes to boil a huge pot of water, and to fill a kitchen sink to just the halfway mark.) I then squirted enough Dawn in the water to make it turn a reasonable blue color, and gently stirred with a wooden spoon that was designated as fiber only. (I don't want to serve food with the same spoon that touches dirty wool water.) I then placed the bags in the sink, horizontally, so as not to disturb my carefully arranged locks. I gently pushed them down with the spoon, until they sank a bit under the water. I let them sit for 15-20 minutes, then carefully lifted them out, let them drip a good deal of water, and put them in the roasting pan (remember that thing?) while I drained the sink and waited until I had boiling water to repeat the process. (I filled the pot and put it on the stove as soon as I put the wool in the water, but it takes so long to boil that the wool got a good rest between each step.) I repeated this soapy soaking 2 more times. I found that on subsequent soakings, the wool packets were very reluctant to sink into the water. My first attempt to solve this problem was to put a couple of wire cooling racks (the kind you use for cookies) on the wool packets, put the roasting pan on top of that, and partially fill it with water, to weigh everything down. That was clumsy and difficult.
After the 3 washes, I did 3 soapless rinses, using the hottest water from the tap. Then I gently squeezed each wool packet, removed the contents, and left the wool on a mesh sweater rack to dry.
What did I learn from my first attempt at the kitchen sink method? I found that the tips didn't come as clean as in the stovetop method, and that cleaner wool floats more readily than dirtier wool. I also learned that one must exercise patience when it comes to wet wool, because separating those layers of locks was a lot easier once it had dried a bit. Before it dried, it just seemed like a matted mess, even though I am now confident that I didn't felt a thing. This reminds me of an episode of Cast On, in which Brenda talks about the urge to toss a lace shawl that she has just washed in preparation for blocking, because it looks like such a hopeless messy pile of stuff. Raw wool is a lot like that. When you pull it out of the water, you can't quite believe what you just did to it, and just have to have faith that, really, it's okay. Think of what your hair looks like when wet. It really does get better.
I found advice somewhere online that picking apart dirty tips before washing can help them get clean, because they'll be more open, allowing the water and detergent to penetrate better. For my next batch, I did this. It was a very labor intensive process -- it took me an hour and a half to prepare just one of the two small mesh bags for scouring. However, the tips did come cleaner, using an otherwise identical process. But I wasn't convinced that it was absolutely worth the time investment, so I tried hand carding one of the "dirtier" locks (none of them were really that dirty) from the previous batch, and found that the resulting rolag was white and fluffy and beautiful. I wouldn't have known that it had a dirty tip, possibly because combing it helped eliminate some of the dirt particles that were stuck in it. Another new thing I did with this batch was to place pieces of tulle between the layers of locks, to keep them more separated. I stole the idea from Sock Pr0n, and it worked beautifully. I also added some wool wash to the last rinse, to add a light scent (of tea tree oil) to the locks, and to hopefully add in some oils, so they wouldn't be too dry from all the scouring.
I had hoped to try washing the rest of what I had left (which felt like a lot) in one or two batches, in a larger mesh bag in the bathtub. But I was unable to get my tap water temperature as hot as I'd like, and did not feel comfortable carrying a huge pot of boiling water from the kitchen to the bathroom. (I already feel that I'm partaking in a dangerous activity by carrying it a couple of feet from the stove to the kitchen sink!) And then I couldn't find my bigger mesh bag. So I decided to try the sink again, but with a twist. After my hour and a half tip picking prep with the previous batch, I read other advice suggesting that a good long soaking can also help open and soften dirty tips, making any subsequent washing more efficient and effective. So I carefully stuffed my 2 smaller mesh bags (again using layers of tulle to separate the layers of locks), and let them soak for a few hours in warm water. As with my initial soak of the Babydoll Southdown, I ended up with rusty orange water. I still don't understand how I could get such bright water from such light colored locks, but it's pretty cool. Here's a photo:
The rest of the process was the same as the other sink washes, except that I decided to do only 2 washes and rinses. The only reason I had been doing three before was to try to get those tips clean, and since I knew that even slightly dirty tips would yield very nice processed wool, I decided to stop obsessing. I also flipped the bags over halfway through each 20 minute session, to overcome any problems caused by its tendency to float. The soaking method worked very nicely, and I think the tips even came a bit cleaner than with the very time consuming picking method. I also started rolling and gently squeezing the bags between each wash, to get as much dirty water out as possible. This will probably be my method from here on out.
To recap, here are the supplies and procedure for the method that works for me. This method may not be best for everyone or for every fleece, but I'm pretty happy with it as a way to scour small to medium sized batches of greasy wool, while maintaining lock structure for combing:
* 1 large kitchen sink
* 1 pair of rubber gloves
* 1 large roasting pan, or other container to hold the bags of fleece while the sink is draining or being refilled
* 1 large wooden spoon, or other stirring implement
* One or two small mesh bags of the sort they sell for washing delicates in a washing machine. I picked mine up at Joann Fabrics.
* One huge pot for boiling water (if you can't turn up your hot water heater, or don't want to because you have small children in the house)
* A yard or so of tulle. I totally overbought, but it's dirt cheap. I had a few choices, and went for the variety with larger holes, and chose white, so there would be no risk of dye bleeding onto my wool.
* scissors to cut the tulle
* A meat or candy thermometer, to check on the temperature of your water. This can be very handy, when you feel that your huge pot of water is about to boil, but aren't sure. I have more than once checked with the thermometer, found that it was already at 206 F (boiling is 212), and decided to just stop waiting and dump it in the sink. Close enough! I watched pot may never boil, but with a thermometer I don't really need it to.
* A large container of blue Dawn dishwashing liquid. (There are other detergents that will work, but this is a popular one, and is easy for me to find at the grocery store.)
* Some no-rinse wool wash, to add to your final rinse.
* A space to lay out the wool to dry.
* A kitchen timer, so you don't forget your wool. (You don't want to leave it in for too long, because the lanolin will redeposit itself onto the wool if the water cools down too much!)
Stuff your bags with wool. If you plan to comb the wool, try to keep it neatly arranged, with layers of tulle between layers of wool. Fill the sink at least halfway, and let the wool soak for at least a couple of hours. (Overnight works well.) Drain the sink, put the wool somewhere (roasting pan, for example) to wait, and fill your sink with very hot water. (I aim for 140-150 F, using boiling water to supplement the tap.) Add in some Dawn, stir, then put in your wool. Set your timer for 10 minutes. After 10 minutes, flip the wool, then let it sit for 10 more minutes. Drain the water, gently squeeze the wool packets, set them aside, and repeat. (If your wool is fairly clean and non greasy, you may not need to repeat. If it's particularly dirt and greasy, you may want to do this three times instead of two.) Next, fill the sink at least halfway with hot water from the tap. It doesn't need to be as hot as the wash water. Let it soak for a good long while, flipping it partway through. Drain, gently squeeze wool packets, and repeat, with slightly cooler water, and a little bit of wool wash. Drain, squeeze your wool, and lay it out in a quiet, sunny (if possible) spot to dry, removing it from the bags and separating the layers, so it will dry more quickly. Unless you're in the desert, count on letting it sit at least a few days. (I find that I only have time to do this once a week or so, so I'll just let it sit for a week or more on the enclosed back porch, until I do the next batch.)
Here are some photos of the magic of scouring:
I hope my bumblings as a new wool scourer are helpful to some of you! Thank you so much to the people who answered questions, exchanged ideas, and generally listened to my ramblings as I was finding my way through this process. (In particular, Stephanie Pearl-McPhee, who generously answered an email in the midst of traveling, and the folks in the Fiber Prep group on Ravelry, which is an amazing resource for anyone thinking of doing any sort of fiber prep.)
I am planning a future post about hand carding and combing fiber. I also have some finished objects to blog about, once I have my photos all together. Again, let me know if you have any fiber prep (or other) questions. I'm really enjoying it, and want to do all I can to convince more of you to try it out.
posted by Rebekkah at 6:06 AM
12 comments
![]()
![]()