objects of great promise
It was a great idea, then a troublesome idea, then a disappointingly bland idea. As I was knitting, I was quite unsure of it. One of those projects where the idea that you thought was brilliant might end up being a more complicated and less attractive variation on something that didn't need to be tinkered with. One of those projects where, in the midst of it, you're sure you'd be better off cutting it off the needles and throwing it to a pack of feral dogs. In the end, I'm fairly pleased at the results. No dogs involved. (I'm quickly learning this is the greatest mental pitfall in designing. Doubting oneself too much right before or right after doubting oneself too little. How does one learn to doubt themself just the right amount?)
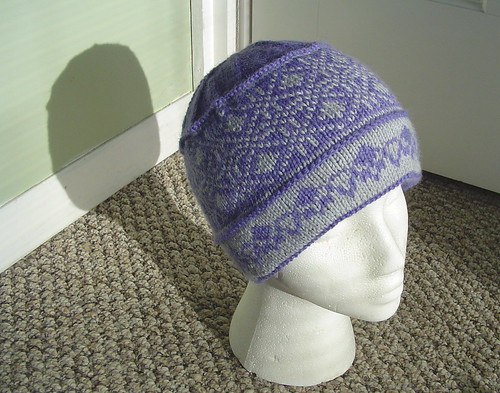
The construction is my own design, and the colorwork charts are adapted from Latvian Dreams. I used leftover worsted weight wools -- Elann Peruvian Highland Wool in purple, and Naturally Merino et Soie in grey.
I was originally inspired to design and knit a colorwork hat with a fold-up brim by a hat I've seen a woman wearing around Keene. (Do you ever find yourself with an urge to go up to someone and ask to examine their clothing? It's so hard to resist, but I want to avoid being known as the town knitting crazy, so I exercise a bit of willpower and leave people alone.) I'm fairly certain that the hat I was admiring is double knit, as the brim pattern is a negative of the pattern on the rest of the hat. It's also obviously machine knit at a very tight gauge, and I knew there was no way I was going to recreate it with the materials I had at hand.
I realized fairly early on that a fold-up colorwork brim wouldn't be easy to execute well. I was concerned with curling, as well as with a way to finish off the top edge of the brim in a neat and tidy manner. I considered an icord edge, but finally decided that it might be interesting to design a hat that looks like it has a colorwork brim, but doesn't really have one. I provisionally cast on the stitches for the hat, knit the brim pattern, and then knit a purl row before moving on to the patterning for the rest of the hat. I hoped this would give the illusion of the edge of a brim, but was unsure of whether the effect would work until the hat was done.
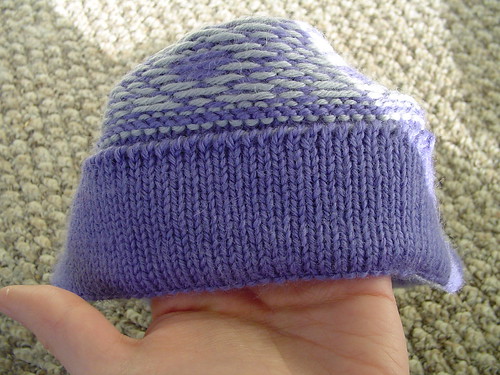
The rest of the hat construction is pretty basic. There is a turned hem, which I knit after the rest of the hat was completed, picking up stitches from the provisional cast on. I knit it in that order because I was frankly not sure how deep the faux brim would be, and wanted the turned hem to attach to the body of the hat where the faux brim ended. That way it added some extra bulk to where the faux brim was, as well as lining up well with some plain (non-colorwork) stitches at the brim transition, which made tacking down the hem a lot easier than it would have been in the midst of floats. Best of all, I didn't have to bind off any stitches. I simply used whip stitch to attach the live stitches at the end of the hem to a row of purl bumps on the inside of the hat. Super simple, and super stretchy. Take a peek:
I don't have a pattern written up for this hat. I eventually want to do it again, but perhaps in a tighter gauge (with sport or fingering weight yarn), and with different colorwork charts. I'm not completely satisfied with the charts I chose for the hat, and would prefer to use something I've designed on my own if I'm going to write up a pattern. Look for it in many months. Many, many months. (Oh, and if you're wondering, there will still be a pattern for that orange and white wavy hat. I've just been dealing with some logistical issues and decisions, which have delayed me. But it's coming. Eventually. Sooner than in many months, if that helps.)
Finishing that hat felt good, but not nearly as good as knitting these:
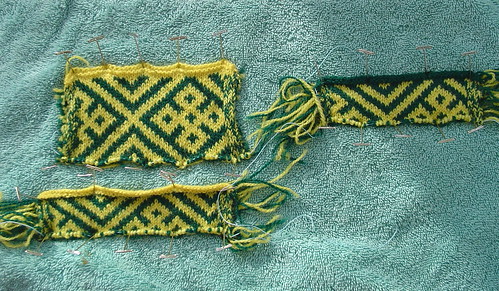
Swatches for my Autumn Color Cardigan! The largest one, in the top left, is the winner. I started out with 2.75mm needles (bottom left swatch), which were just way too small. The 3mm needles were too small, also, so I channeled my inner Goldilocks and made things work out on the third try. 3.25mm needles it is. I'm going to have to block a bit for length, most likely, but not too much. I was having a lot of trouble getting anywhere near the row gauge I needed (8.5 rows per inch), but got pretty close with the 3.25mm needles, and don't want to go any larger, as that will be very bad for my stitch gauge. All in all, I'm satisfied. I won't have to redesign the sweater or block it to death to get something the right size.
I really love the fabric I got on the 2.75mm needles. I think that's what I'd be likely to use if I were designing my own sweater from scratch. In case you're wondering why the losing swatches are so small, it's because they're not done. They don't need to be done because it was pretty obvious from initial measurements that they weren't going to work. But one of the great things about the method I use for knitting fair isle swatches is that they never need to be done. I always knit on the right side, breaking the yarn at the end of the row, shifting the knitting back to the other end of the circular needles, and starting again for the next row. You can always add more rows to your swatch later, if you put it on scrap yarn instead of binding off. I don't purl back in fair isle sweaters, so I definitely don't want to purl back in my swatches. I know that there's an option to leave loops of yarn across the back, instead of breaking them off, but I don't like that method. With my method, I can tie the yarn ends together to keep the edges nice and tight. I also find that the looping method creates a lot of confusion and potential tangles for me, and don't think it would be as easy to block as the method I use. It means you need to be willing to sacrifice some yarn, but I also think it's worth keeping a couple of extra balls of yarn around just for this purpose.
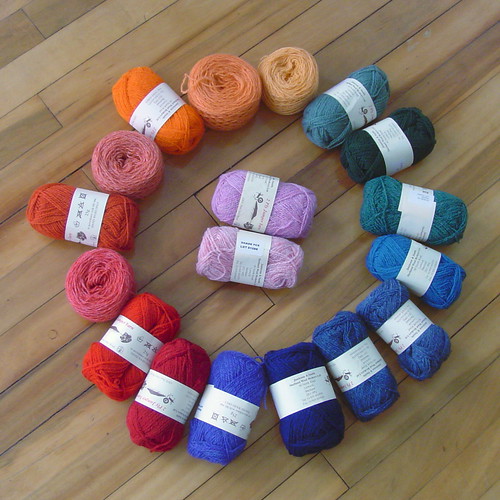
By the way, those aren't the colors of the sweater. I just used some J&S I have sitting around for swatching purposes. The real sweater will be a lot more colorful:

The construction is my own design, and the colorwork charts are adapted from Latvian Dreams. I used leftover worsted weight wools -- Elann Peruvian Highland Wool in purple, and Naturally Merino et Soie in grey.
I was originally inspired to design and knit a colorwork hat with a fold-up brim by a hat I've seen a woman wearing around Keene. (Do you ever find yourself with an urge to go up to someone and ask to examine their clothing? It's so hard to resist, but I want to avoid being known as the town knitting crazy, so I exercise a bit of willpower and leave people alone.) I'm fairly certain that the hat I was admiring is double knit, as the brim pattern is a negative of the pattern on the rest of the hat. It's also obviously machine knit at a very tight gauge, and I knew there was no way I was going to recreate it with the materials I had at hand.
I realized fairly early on that a fold-up colorwork brim wouldn't be easy to execute well. I was concerned with curling, as well as with a way to finish off the top edge of the brim in a neat and tidy manner. I considered an icord edge, but finally decided that it might be interesting to design a hat that looks like it has a colorwork brim, but doesn't really have one. I provisionally cast on the stitches for the hat, knit the brim pattern, and then knit a purl row before moving on to the patterning for the rest of the hat. I hoped this would give the illusion of the edge of a brim, but was unsure of whether the effect would work until the hat was done.
The rest of the hat construction is pretty basic. There is a turned hem, which I knit after the rest of the hat was completed, picking up stitches from the provisional cast on. I knit it in that order because I was frankly not sure how deep the faux brim would be, and wanted the turned hem to attach to the body of the hat where the faux brim ended. That way it added some extra bulk to where the faux brim was, as well as lining up well with some plain (non-colorwork) stitches at the brim transition, which made tacking down the hem a lot easier than it would have been in the midst of floats. Best of all, I didn't have to bind off any stitches. I simply used whip stitch to attach the live stitches at the end of the hem to a row of purl bumps on the inside of the hat. Super simple, and super stretchy. Take a peek:

I don't have a pattern written up for this hat. I eventually want to do it again, but perhaps in a tighter gauge (with sport or fingering weight yarn), and with different colorwork charts. I'm not completely satisfied with the charts I chose for the hat, and would prefer to use something I've designed on my own if I'm going to write up a pattern. Look for it in many months. Many, many months. (Oh, and if you're wondering, there will still be a pattern for that orange and white wavy hat. I've just been dealing with some logistical issues and decisions, which have delayed me. But it's coming. Eventually. Sooner than in many months, if that helps.)
Finishing that hat felt good, but not nearly as good as knitting these:

Swatches for my Autumn Color Cardigan! The largest one, in the top left, is the winner. I started out with 2.75mm needles (bottom left swatch), which were just way too small. The 3mm needles were too small, also, so I channeled my inner Goldilocks and made things work out on the third try. 3.25mm needles it is. I'm going to have to block a bit for length, most likely, but not too much. I was having a lot of trouble getting anywhere near the row gauge I needed (8.5 rows per inch), but got pretty close with the 3.25mm needles, and don't want to go any larger, as that will be very bad for my stitch gauge. All in all, I'm satisfied. I won't have to redesign the sweater or block it to death to get something the right size.
I really love the fabric I got on the 2.75mm needles. I think that's what I'd be likely to use if I were designing my own sweater from scratch. In case you're wondering why the losing swatches are so small, it's because they're not done. They don't need to be done because it was pretty obvious from initial measurements that they weren't going to work. But one of the great things about the method I use for knitting fair isle swatches is that they never need to be done. I always knit on the right side, breaking the yarn at the end of the row, shifting the knitting back to the other end of the circular needles, and starting again for the next row. You can always add more rows to your swatch later, if you put it on scrap yarn instead of binding off. I don't purl back in fair isle sweaters, so I definitely don't want to purl back in my swatches. I know that there's an option to leave loops of yarn across the back, instead of breaking them off, but I don't like that method. With my method, I can tie the yarn ends together to keep the edges nice and tight. I also find that the looping method creates a lot of confusion and potential tangles for me, and don't think it would be as easy to block as the method I use. It means you need to be willing to sacrifice some yarn, but I also think it's worth keeping a couple of extra balls of yarn around just for this purpose.
By the way, those aren't the colors of the sweater. I just used some J&S I have sitting around for swatching purposes. The real sweater will be a lot more colorful:

Labels: AutumnColorCardigan, colorwork, finishedproject, hat




19 Comments:
Your hat is beautiful!
Nice hat! I love the colors for your upcoming sweater. Can't wait to see progress pictures.
You've got some seriously impressive colowork skills. Bravo!
Great hat! I love the photo of all your colors, too.
Rebekkah, I always love to read about your design process and I'm glad to hear you will be publishing your patterns.
Now I'm off to look at my Peruvian Highland wool stash because I know I have that lovely purple color and need to use it for something.
The hat is lovely!
I hope you left some of those blues for me ;-) They look like what I need for the Lismore.
Congrats on the hat! I agree with your swatch selection... more breathing room for the pattern. It's going to look great!
Your hat came out wonderfully and I bet it is very warm. I love a knitted brim.
And your new sweater should be just gorgeous in those colors! Can't wait to see it coming together.
wow. i actually read every word! i find colorwork fascinating. i can't wait to see the yarns of the new sweater knitted together. i love the combination of opposite colors :)
Those colors are amazing! I can't wait to see the finished product!
Yow! That sweater is going to be amazing in those colors. The blues are spectacular.
As far as doubting yourself the right amount- let me know if you figure that one out!
It is gonna be pretty darn exciting watching that sweater grow! The colors look different from the original ones it the book; am I right?
Your hat design turned out very nice! The double thickness of the hem is nice for keeping ears extra toasty too.
Can't wait to see the Autumn Cardi come together, it's a beautiful design!
That'll be stunning - I love the colors!
You go girl!! Absolutely love the colors in the Autumn sweater. Next hat to go with the sweater with the J&S leftovers?
Ooh! I look forward to watching the AutumnColor piece develop. Your hat is excellent, and I like the way you engineered the hem. Nice!
That could brighten up any day. Beautiful pattern, great job!
Do you ever find yourself with an urge to go up to someone and ask to examine their clothing?
Oh yes. And there's one situation in particular where I'm kicking myself more than a little that I didn't. Or at least take a sneaky photo.
You really hit the mark with the hat. The pattern adaptation is perfect, your faux brim works (the purl row is a good effect) and I love the colors.
And yes, I ALWAYS want to go inspect people's knits, ask them if I could borrow them for a few days while I take notes and swatch...
Post a Comment
<< Home