in which she goes on at great length about Ingeborg finishing (some pics!)
I might as well post some Ingeborg progress today, as the camera may be up north for the next couple of days.
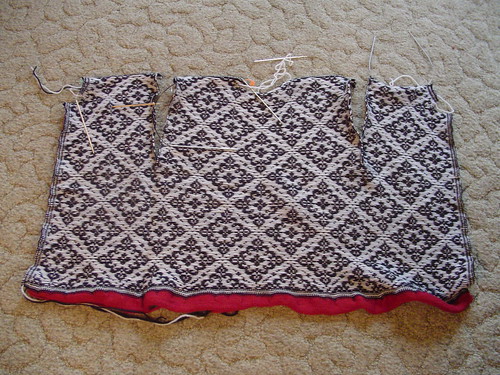
The Ingeborg finishing has already been quite an educational experience. I had left the neck stitches live, instead of binding off, because it seemed that would be easier. I could just do a 3 needle bindoff later, right? Well, yes, in theory. In practice, sleeve steeks don't land perfectly centered, and you don't end up with the same exact number of stitches to bind off together on the front and back of the shoulder on either side. I could have done a 3 needle bindoff with some fudging, but I ended up binding off those stitches and seaming the shoulder, anyway. Truthfully, it would have been easier if I'd just bound off those stitches before steeking. Oh, well. A lesson for next time, I suppose. For fun, here is a (wrong side) photo of Ingeborg after all the steeks were cut, but before just about anything else was done:

As you can see, I had to transfer the live shoulder stitches to four separate circs, since the steeks were already cut. It was a... process.
Unfortunately, the pattern leaves one a bit in the dark as to how to actually do the seaming. It refers you to page 1 of the book for seaming instructions. Unfortunately, those seaming instructions consist of one smallish black and white photo, with no caption or instructions. It looks kind of like they're suggesting to whip stitch the pieces together from the right side, leaving the yarn you're sewing with completely exposed. That's not what I'm doing. Carol suggested basting the sleeve to the arm, then either machine sewing it in or backstitch them in. I think she said from the wrong side, which would make sense for that technique, I suppose. (Bonus trivia: I couldn't think of the word "backstitch", but remember I saw the term for it on Wendy Johnson's blog earlier today when searching for info., and just did another search so I could find that blog entry and get the word. My brain is a sieve!) Advice I've seen elsewhere suggests knitting it together from the right side (as in the Dale book), but to do it the way you'd sew in any sleeve, with a mattress stitch. Actually, I'm not sure if it's still called mattress stitch if you're working with knitted fabric in two different orientations, but if you've seamed before, you know what I'm talking about.
I played with a few of these techniques, and I think the one I'm going to go with is the mattress stitch. I've done it before, and there's no reason it shouldn't work here, right? I also think it looked nicest of the techniques I tried. That may be because I'm so inexperienced at sewing that it's the only technique I did competently.
After settling on a technique comes the issue of how to get the sleeve to lineup properly. Last night I wove in all the ends on the sleeves and body, except for a few that I'll be able to hide more easily once I do the button band. That cleaned my slate a lot, which was nice. (I also tacked down the hems on the sleeves, since I had the time, but not the concentration to start playing around with seaming techniques.) Some may call yesterday's Ingeborg finishing activities procrastination, but I call in preparation. I'm about to do the hardest part, and the more finished I can make the rest of the sweater before digging in, the easier it will be to concentrate just on this.
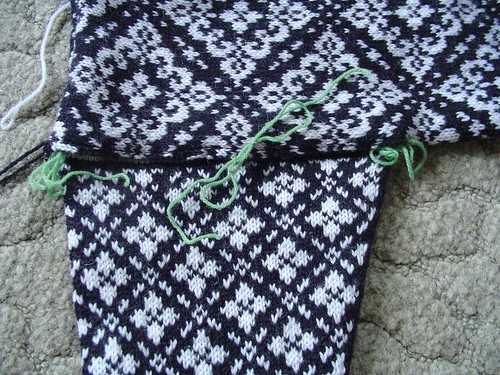
I tried pinning the sleeve to the body, but ya know, that can be wonky. That's what I always do, but for some reason, it just seemed to be more of a pain than usual here. Instead, I decided to use a method that involved no sharp, pointy things. I used scrap yarn to tie the body to the sleeve at three points - the bottom of the sleeve, the top of the sleeve, and the center of the side of the sleeve I'd start on. I'm really happy with this. T-pins slide around, poke me, and tend to distort the fabric. I'm happy with where I am, but find this overall process fairly stressful. I may leave the actual seaming until tomorrow. When I'm in the mood for seaming, I actually enjoy it. I'm not in the mood today.

The Ingeborg finishing has already been quite an educational experience. I had left the neck stitches live, instead of binding off, because it seemed that would be easier. I could just do a 3 needle bindoff later, right? Well, yes, in theory. In practice, sleeve steeks don't land perfectly centered, and you don't end up with the same exact number of stitches to bind off together on the front and back of the shoulder on either side. I could have done a 3 needle bindoff with some fudging, but I ended up binding off those stitches and seaming the shoulder, anyway. Truthfully, it would have been easier if I'd just bound off those stitches before steeking. Oh, well. A lesson for next time, I suppose. For fun, here is a (wrong side) photo of Ingeborg after all the steeks were cut, but before just about anything else was done:

As you can see, I had to transfer the live shoulder stitches to four separate circs, since the steeks were already cut. It was a... process.
Unfortunately, the pattern leaves one a bit in the dark as to how to actually do the seaming. It refers you to page 1 of the book for seaming instructions. Unfortunately, those seaming instructions consist of one smallish black and white photo, with no caption or instructions. It looks kind of like they're suggesting to whip stitch the pieces together from the right side, leaving the yarn you're sewing with completely exposed. That's not what I'm doing. Carol suggested basting the sleeve to the arm, then either machine sewing it in or backstitch them in. I think she said from the wrong side, which would make sense for that technique, I suppose. (Bonus trivia: I couldn't think of the word "backstitch", but remember I saw the term for it on Wendy Johnson's blog earlier today when searching for info., and just did another search so I could find that blog entry and get the word. My brain is a sieve!) Advice I've seen elsewhere suggests knitting it together from the right side (as in the Dale book), but to do it the way you'd sew in any sleeve, with a mattress stitch. Actually, I'm not sure if it's still called mattress stitch if you're working with knitted fabric in two different orientations, but if you've seamed before, you know what I'm talking about.
I played with a few of these techniques, and I think the one I'm going to go with is the mattress stitch. I've done it before, and there's no reason it shouldn't work here, right? I also think it looked nicest of the techniques I tried. That may be because I'm so inexperienced at sewing that it's the only technique I did competently.
After settling on a technique comes the issue of how to get the sleeve to lineup properly. Last night I wove in all the ends on the sleeves and body, except for a few that I'll be able to hide more easily once I do the button band. That cleaned my slate a lot, which was nice. (I also tacked down the hems on the sleeves, since I had the time, but not the concentration to start playing around with seaming techniques.) Some may call yesterday's Ingeborg finishing activities procrastination, but I call in preparation. I'm about to do the hardest part, and the more finished I can make the rest of the sweater before digging in, the easier it will be to concentrate just on this.
I tried pinning the sleeve to the body, but ya know, that can be wonky. That's what I always do, but for some reason, it just seemed to be more of a pain than usual here. Instead, I decided to use a method that involved no sharp, pointy things. I used scrap yarn to tie the body to the sleeve at three points - the bottom of the sleeve, the top of the sleeve, and the center of the side of the sleeve I'd start on. I'm really happy with this. T-pins slide around, poke me, and tend to distort the fabric. I'm happy with where I am, but find this overall process fairly stressful. I may leave the actual seaming until tomorrow. When I'm in the mood for seaming, I actually enjoy it. I'm not in the mood today.


3 Comments:
Thanks for your notes! They'll come in handy when I start on another Norwegian knit. The sweater looks gorgeous!
- MJ
Your Ingeborg is fantastic! Absolutely inspiring.
Hi from Austria! I'm so impressed by your Ingeborg, it looks amazing, a true piece of art! And thank you so much for your notes, I'm about to try my hands at Norwegian knits soon as well and these will come in very handy then!
Post a Comment
<< Home